Posts Tagged ‘Papervision’
This tutorial is an expansion on Loading 3D objects created in Max (using COLLADA)…
var myobjMaterials:MaterialsList = new MaterialsList();myobjMaterials.addMaterial(new BitmapMaterial(new sacktexture(1024, 1024)));
and thats all there is to it!
This tutorial is designed for Flash Actionscript 3.0 with PV3D 2.0 (GreatWhite) repositries..
Before you begin, please make sure that you have downloaded the necessary PV3D repositries
from the SVN. [if you dont know how to this, then please check step 1 AND step 4 in this tutorial]
If you have already done this then please read on!
first off, we will create an empty .FLA file (this will allow us to read the .as file we will make
and will help us run it!)
File > New (ctrl+N)
select Flash File (Actionscript3) and click ok.
Now save that under whatever name you like.
Now we need to create an Actionscript file (.as)
File > new (Ctrl+N)
select Actionscript File and click ok.
Now save this using whatever name you like – I will call it Example.as
It is in this example.as file where we will write our code. but first we need to link
it to the .FLA file we made earlier.
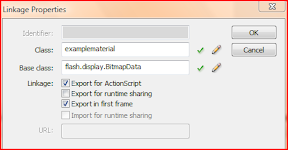
click on the tab to open your .FLA file and look near the bottom of your screen, in the
properties tab, for something called Document Class in the text box to the right of it, enter
your .as file name – in this case example and click on the little pencil icon to scan for the file.
now that the files are linked we can compile and run our actionscript when we need to test
out our video.
now for the code – put this in you .as file:
package{
import org.papervision3d.objects.primitives.*;
import org.papervision3d.view.BasicView;
import org.papervision3d.materials.WireframeMaterial;
import org.papervision3d.materials.utils.MaterialsList;
//For importing objects
import org.papervision3d.objects.parsers.DAE;
import org.papervision3d.objects.DisplayObject3D;

 [SWF(width="640", height="320", backgroundColor="#000000", frameRate="60")]

 public class Example extends BasicView {
//private var myMaterials:Object;

     public function Example()
{
var sphere:Sphere = new Sphere();
sphere.x = 150;
scene.addChild(sphere);
//text output in debuger window to see if code
//is going through loop
trace("DRAW sphere");

var plane:Plane = new Plane();
plane.x = -150;
scene.addChild(plane);
trace("DRAW plane");

var cylinder:Cylinder = new Cylinder();
scene.addChild(cylinder);
trace("DRAW cylinder");

startRendering();
 }
}
}
Now to test what we have written, press ctrl+enter key and wait for the results!
For a 3D cube, add the following code, before “startRendering()”
//FOR 3D CUBE   //code for material - more will  be covered on this later
var frontMaterial:WireframeMaterial = new WireframeMaterial();
var backMaterial:WireframeMaterial = new WireframeMaterial();
var leftMaterial:WireframeMaterial = new WireframeMaterial();
var rightMaterial:WireframeMaterial = new WireframeMaterial();
var topMaterial:WireframeMaterial = new WireframeMaterial();
var bottomMaterial:WireframeMaterial = new WireframeMaterial();

var materialsList:MaterialsList = new MaterialsList();

materialsList.addMaterial(frontMaterial, "front");
materialsList.addMaterial(backMaterial, "back");
materialsList.addMaterial(leftMaterial, "left");
materialsList.addMaterial(rightMaterial, "right");
materialsList.addMaterial(topMaterial, "top");
materialsList.addMaterial(bottomMaterial, "bottom");

var cube:Cube = new Cube(materialsList);
//cube.x = 100;
//need to rotate cube, otherwise it will look like a Plane.
cube.rotationY = 45;
cube.rotationX = 45;
scene.addChild(cube);
//END 3D Cube
A tutorial for loading in 3D objects made in a 3D package such as Max can be found here
- Use an SVN client to download Papervision deposetries
- Install ColladaMax extension on 3Ds Max
- Convert models into .DAE files
- add PV3d (Papervision3D) component to Flash via the Extension Manager
- download and “install” it (once installed it will appear in the right click menu in windows – it does not technicaly appear in Programe folders)
- Create a new folder, and call it Papervision3d “or whatever you want to call it.
- right click the folder and chose SVN Checkout
- direct the folder to http://papervision3d.googlecode.com/svn/trunk

- Choose which directory you would like to install it in, and click ok – now the SVN should be doing all the work downloading the PV3D files into your specified directory.
- but for a direct download of the ColladaMax extension click here
- once this is downloaded and installed in 3ds Max, you can now start exporting models
3 – Exporting .DAE files
- As Papervision only reads .DAE files you need to export your models as .DAE this can be done by:
- Click File > Export , then select COLLADA (*.DAE)
- Make sure that, if you have more that one object in the scene that it is all connected as 1 object. and for Textures, use UVW mapping and apply it to the DIFFUSE channel in the material editor – otherwise texturing wont work.
- download the component here
- Open up Adobe Extension Manager, If you dont have it, you can get it from the Adobe site download it here
- once installed hold down Ctrl + O to add a new extension, browse to the component .MXP file that you just downloaded and click ok

- Open up Flash CS3, and now you should have PV3D in the Components window
- To gain access to the PV3D panel – in the toolbar click


